安装篇
使用本文描述方式,可以顺利搭建Kubernetes集群,便于学习及相关验证使用。
节点规划
环境准备
三台主机操作系统均为 Centos7 ,其他操作系统大同小异,可具体系统具体分析。
三台主机均已安装 Docker ,并已配置国内可用镜像,可根据情况具体选用。
本文中的 Kubernetes 版本为1.18.0,Docker 为 docker-ce-18.06.1.ce-3.el7 。
操作步骤
主机设置
关闭 selinux
sed -i 's/enforcing/diabled/' /etc/selinux/config关闭swap
sed -ri 's/.*swap.*/#&/' /etc/fstab关闭防火墙
systemctl stop firewalld.service
systemctl disable firewalld.service
设置主机名
# 依次在三台主机上修改主机名称
hostnamectl set-hostname node01
hostnamectl set-hostname node02
hostnamectl set-hostname node03
修改hosts
cat >> /etc/hosts << EOF
192.168.10.11 node01
192.168.10.12 node02
192.168.10.13 node03
EOF
流量传递设置
cat > /etc/sysctl.d/k8s.conf << EOF
net.bridge.bridge-nf-call-ip6tables = 1
net.bridge.bridge-nf-call-iptables = 1
EOF

sysctl --system
时间同步
yum install ntpdate -y
ntpdate time.windows.com
Docker安装
wget https://mirrors.aliyun.com/docker-ce/linux/centos/docker-ce.repo -O /etc/yum.repos.d/docker-ce.repo
yum -y install docker-ce-18.06.1.ce-3.el7
systemctl enable docker && systemctl start docker
docker --version
# 执行完上一步出现版本信息,即Docker安装成功。
cat > /etc/docker/daemon.json << EOF
{
	"registry-mirrors":["https://docker.1panel.live",
    "https://docker.1ms.run",
    "https://dytt.online",
    "https://docker-0.unsee.tech",
    "https://lispy.org",
    "https://docker.xiaogenban1993.com",
    "https://666860.xyz",
    "https://hub.rat.dev",
    "https://docker.m.daocloud.io",
    "https://demo.52013120.xyz",
    "https://proxy.vvvv.ee",
    "https://registry.cyou",
    "https://mirror.ccs.tencentyun.com"]
}
EOF
systemctl daemon-reload
systemctl restart docker
kubeadm|kubelet|kubectl 安装
cat > /etc/yum.repos.d/kubernetes.repo << EOF
[kubernetes]
name=Kubernetes
baseurl=https://mirrors.aliyun.com/kubernetes/yum/repos/kubernetes-el7-x86_64
enabled=1
gpgcheck=0
repo_gpgcheck=0
gpgkey=https://mirrors.aliyun.com/kubernetes/yum/doc/yum-key.gpg
https://mirrors.aliyun.com/kubernetes/yum/doc/rpm-package-key.gpg
EOF

yum install -y kubelet-1.18.0 kubeadm-1.18.0 kubectl-1.18.0
systemctl enable kubelet
集群初始化
仅在 Master 节点上执行。
kubeadm init \
--apiserver-advertise-address=192.168.10.11 \
--image-repository registry.aliyuncs.com/google_containers \
--kubernetes-version v1.18.0 \
--service-cidr=10.96.0.0/12 \
--pod-network-cidr=10.244.0.0/16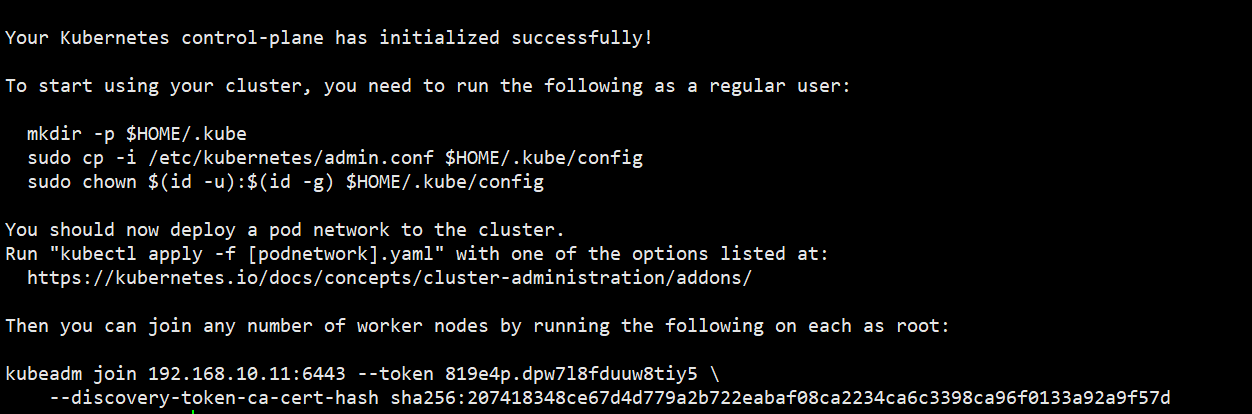
出现类似上图即为安装成功。
在 Master 节点上执行 mkdir 开始的三行指令。
在两个 Node 节点上执行最后的 join 命令。
网络插件安装
kubectl apply -f https://raw.githubusercontent.com/coreos/flannel/master/Documentation/kube-flannel.yml安装验证
kubectl get nodes # 三个节点状态均为 Ready 即为安装成功。相关链接
官网:Kubernetes
在使用过程中,有任何问题都可以通过以上链接找寻答案。